Showing posts with label Blogging. Show all posts

Thursday, March 8, 2018

How to Create Blog on "Blogger.com" and Tips

Do you like to learn to blog is simply go to my site and learn to write with blogger. Here I started writing on the platform blogger.com. No cost to you and you will have you own site.

Would you do to earn by blogging. The first should questions you are what passion you or where you expert. That's the write you to blog you do. For example if you love new gadget. Write you about gadgets bought you. for example I bought the gadget here to Devisorya, the amount is 100 pesos only. many here class with small with large and etc.

You need for diligence and perseverance writing articles. Not just concentrated reading, we must also Act for we will succeed. Prayer also our Lord is required. Said then re have planted with harvest. So you write the articles with available knowledge. For back to go back to your site.

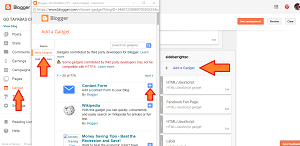
There are video tutorials me to my YouTube channel. So if you like to learn to blog. Subscribe you to my channel and you go to my playlist about blogging. For the beginner more on the blog, good to watch you here. To my playlist learn able to make articles with blogger.com. You'll learn also if how put called gadgets using here.

Thursday, July 13, 2017

Automatic share the Blogger post to Google+

Your Blogger post are automatically share to Google+ if you follow my tutorials below. Connect or use Google+ are to engage to our readers of Blog you create.

Here the Procedure to share automanatically post your Blog to Google+:

  • First thing we do is sign in to Blogger and select the Blog title to update.
  • Go to menu and click the Settings > Posts, comments and sharing> scroll down and Click YES beside the > "Auto-share new published posts to your Google+ profile."
  • In the upper right corner, click the Save settings.
  • Share automatically post to Google+ is a best way to less a time for share your post to others. But if you cannot share the one post below i have a procedure manually.

    Here the Procedure to share manually post your Blog to Google+:

  • Sign in to Blogger account and select Blog tittle to update.
  • In the left side menu of screen > click Posts and Choose your post you want to share, put the arrow under the post you want to share and choose SHARE.
  • Pop up a box will show your post you want to share. You can edit and add a message.
  • Monday, May 8, 2017

    How to get Contact us and put in your Blog Page "Blogger"

    If you have a Blog or Website, you also have a contact us to connect reader to the admin of Blog or Website. In this tutorial i would like to share a simple step to create a contact to the admin of site;

  • To test your Blog if they have connect to your email. First login to your Blogger > dashboard > layout > Add a Gadget > and in the pop up windows > More Gadgets > click + to add a gadget to your Blog.
  • After finish the step above try to send a message to your contact us form. Go to your Blog and go to your contact us where you put them. Go to your Email and check the inbox if the message are in your inbox. After proof if the message are in inbox, delete the Gadget. By going to Blogger dashboard > Layout > Edit the Gadget and the pop up windows show, delete or remove the Gadget.
  • Here the procedure to create a Contact us in your Page.

  • Go to Dashboard > Pages > New Page and create a Page click the HTML beside Compose and put the code here, after finish click Publish. How to put Page to Gadget.
  • Here the CODE and Procedure to get Blog ID.

  • The Blog ID is located on search Bar we have 19 Digit number. Replace the Blog ID in CODE below.
  • <script>
    var blogId = 'BLOG ID';//this number should be mandatorily edited.
    //The below message 5 Strings can also be edited
    var contactFormMessageSendingMsg ='Sending...';
    var contactFormMessageSentMsg = 'Your message has been sent.';
    var contactFormMessageNotSentMsg = 'Message could not be sent. Please try again later.';
    var contactFormEmptyMessageMsg ='Message field cannot be empty.';
    var contactFormInvalidEmailMsg = 'A valid email is required.'
    
    var widgetLoaded=false;
    function sendEmailMsg() {
    if(widgetLoaded== false) {
    _WidgetManager._RegisterWidget('_ContactFormView', new _WidgetInfo('ContactForm1', 'sidebar', null, document.getElementById('ContactForm1'), {'contactFormMessageSendingMsg': contactFormMessageSendingMsg , 'contactFormMessageSentMsg': contactFormMessageSentMsg , 'contactFormMessageNotSentMsg': contactFormMessageNotSentMsg , 'contactFormInvalidEmailMsg': contactFormInvalidEmailMsg , 'contactFormEmptyMessageMsg': contactFormEmptyMessageMsg , 'title': 'Contact Form', 'blogId': blogId, 'contactFormNameMsg': 'Name', 'contactFormEmailMsg': 'Email', 'contactFormMessageMsg': 'Message', 'contactFormSendMsg': 'Send', 'submitUrl': 'https://www.blogger.com/contact-form.do'}, 'displayModeFull'));
    widgetLoaded=true;
    document.getElementById('ContactForm1_contact-form-submit').click();
    }
    return true;
    }
    </script>
    <form name='contact-form'>
    <div>Your Name : </div>
    <input class='contact-form-name' id='ContactForm1_contact-form-name' name='name' size='30' type='text' value=''/>
    <div>Your Email: <em>(required)</em></div>
    <input class='contact-form-email' id='ContactForm1_contact-form-email' name='email' size='30' type='text' value=''/>
    <div>Your Message: <em>(required)</em></div>
    <textarea class='contact-form-email-message' id='ContactForm1_contact-form-email-message' name='email-message' rows='5'></textarea>
    <p></p>
    <input class='contact-form-button contact-form-button-submit' id='ContactForm1_contact-form-submit' type='button' value='Send' onclick="sendEmailMsg()"/>
    <div style='text-align: center; max-width: 450px; width: 100%'>
    <p class='contact-form-error-message' id='ContactForm1_contact-form-error-message'></p>
    <p class='contact-form-success-message' id='ContactForm1_contact-form-success-message'></p>
    </div>
    </form>
    

    Now we have a Contact form, try it if working?

    Tuesday, April 11, 2017

    How to get RSS Feed URL on your BLOG via Blogger

    In this tutorials i will show you how to get RSS Feed on your Blog via Blogger. Sometimes we need to get RSS Feed URL of your Blog to share your content to other site automatically.

    Blogger Blog is hosted by GOOGLE, indicates the (blogname.blogspot.com) you'll see on new create Blog Site on Blogger. But if you have to buy a domain name like .com, .net, etc.

    You'll see like this (blogname.com) on RSS Feed URL. Below there are different type of RSS Feed URL.

    RSS Feed URL-Full Site

  • Atom 1.0: http://blogname.blogspot.com/feeds/posts/default
  • RSS 2.0: http://blogname.blogspot.com/feeds/posts/default?alt=rss

    RSS Feed URL-Comments-only

  • Atom 1.0: http://blogname.blogspot.com/feeds/comments/default
  • RSS 2.0: http://blogname.blogspot.com/feeds/comments/default?alt=rss

    RSS Feed URL-Label-specific Site

  • Atom 1.0: http://blogname.blogspot.com/feeds/comments/default/-/labelname
  • RSS 2.0: http://blogname.blogspot.com/feeds/comments/default?alt=rss/-/labelname

    RSS Feed URL-Individual Post Comment

  • Atom 1.0: http://blogname.blogspot.com/feeds/postId/comments/default
  • RSS 2.0: http://blogname.blogspot.com/feeds/postId/comments/default?alt=rss
  • Wednesday, January 18, 2017

    Wednesday, January 4, 2017

    How to put Page-level ads in your Blog on HTML


    Page-level Ads are ads that appear on mobile phones only, click the page on the website or blog. Here are two key classes Anchor / Vignette overlay ads and ads

    Tuesday, December 13, 2016

    Monday, December 12, 2016

    How to create bar menu on blogger in Page gadget


    Page Link to other Website or Blog.

    In menu bar you can separate post in different categories.

    First log in to your blogger account go to dashboard and click the layout and select Add a Gadget.

    Saturday, December 10, 2016

    How to change or remove favicon in blogger

    Favicon icon is the small image, show in the top if your screen appear, beside the site you visit.

    How to create post on your Blog in Blogger

    First log in to your Blogger account, in your dashboard click Post>New Post.

    Post title, put title in the post.

    Compose new post or write your new post.

    Click HTML for user with knowledge in program.

    You can compose new design with different size,color,style etc.. with this gadget.

    In this Post settings you can change all you want in Labels,schedule,permalink,location and other click options

    Click preview you can show your finish product of your new post. and click save if your post is not finish, lastly click save and your done...

    Wednesday, December 7, 2016

    Adding Read more button, Automatic for every post in Blogger for your home page and other page.


    Here the very simple and past way to create a READ MORE button on your blog,

    First login to your Blogger dashboard and go to blog you like to insert a Read more button.

    Richard N. Cabile

    All about myself. Everything I know I will teach you.

    Read more..

    My Motto in Life: Time is Gold.