In this tutorial, I will show you how to make Wedding Album Design. Using Adobe Photoshop CS6. I used my image, when I was married. I just share with you how to create an image that you put in your Wedding Album.
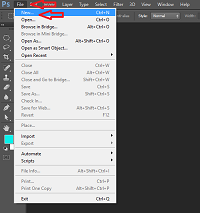
1. Create new document, click > File > Open > and select image and click Open.
2. Select image for background.
3. Press CTRL+J to duplicate the layer.
4. To transform the image click > Edit > Transform > and select scale.
5. Click the Illiptical Marquee Tool to cut the Image.
6. Delete the Folder.
7. Add a leyer style and select Outer Glow.
8. You can adjust, resize or change the color you desire and click OK.
Repeat the procedure to all image you apply to the background image.
I'll show you how to make your image background blur. Using the Photoshop application. You'll know how to do it. Background only will be Blur.
Choose an image to use. In Photoshop click File> Open and select the image. Duplicate the image by click CTRL + J.
Go to the Tool Bar. You select the Pen Tool. And you select the image that you will not make Blur.
After cutting the image will not be Blur. Right Click and select Make a selection. A pop up will appear and click OK. To duplicate the Layer press CTRL + J.
To become Background Blur, Select Blur Tool in Photoshop Tool Bar.
Transform the image in a great place using Photoshop. You will learn in my tutorial a simple way to change your image background. You will learn free Photoshop Tutorials. I will tell you how to change background in Photoshop. So you just subscribe to my YouTube Channel for the new Video Tutorials.
Choose an image to use and image background you want to replace. Click the File > Open and select image.
With the Pen Tool cut the image.
After cutting the image, right click and select make a selection and click OK.
Go to the layer and to cut the selection layer, click Ctrl + J. And take the background image and place it below the selection layer to become the background.
Hi guys I just share with you how to make an animation using Photoshop. I used the image of the ball. How to bounce it using the Photoshop application. I already use Photoshop CS6. Ok let's start.
First you click File> Open> and find the image to use in pop up windows. Once found, just click open in the bottom right corner of the window.
Adjust the image to your desired size. Then put this here to start bouncing.
Go to Layer and Duplicate you here. With a short cut so you can duplicate it quickly, just hit CTRL + J on your keyboard and it will be duplicated. Right click on the layer that you want to duplicate. then you select the duplicate layer. Repeat this way where you can beat the ball or something you want to make an animation.
Un hide all layers except the first layer. Click the Menu Bar on the windows and go to the Timeline. Click Create Frame Animation. In the timeline you click the Duplicate selected frame, so you can create a new frame. Ok duplicate the first frame. To hide or unhide the layer you click the eye icon on the layer. Then you hide the first layer, Unhide the second layer, duplicate the second frame and then hide the second layer, unhide the third layer, duplicate the third frame. Repeat until the layers drain.
Do you want to know how to save in GIF file? Watch the video below, at the end of the video to know how to save it to the GIF file.
In this tutorial you'll learn to wrap the text using Photoshop. You can use it in round-shaped logos or in ribbon style in your logo. You'll also change the fonts or colors of the text wrap. The wrap text has many uses, such as t-shirt design, printing and much more.
1. First you create a new document in your Photoshop. With the Type tool of Photoshop.
2. In the Photoshop menu bar click > Type > Warp text. In the Warp text box select style > and click the text style you want.
Those who want to learn animation. I will show you how to make the animation Tarpaulin Design. I used Ben10 with Birthday Design. It shows how to create an animation in your Photoshop application. And how you can save it to GIF file.
1. In the layer area you click the eye shape to hide the layer, except the background layer.
2. Go to the Main Menu and click the Window next to the Timeline and click Create Frame Animation.
3. Touch Duplicate Selected Frames followed by the Indicates Layer Visibility. Repeat until all layers are placed.
4. Select Forever in Looping Options and press the play button.
5. Click File and select Save for Web, and click save, select the folder you want to save. Finished, it has that GIF Image file.
Do you want different text styles. Photoshop user can tell you how to install Fonts. There are many Fonts for our photoshop application but most of us do not know how to use it. Many sites provide fonts here that are spread over the internet. All you have to do is download and I will tell you how to install it.
First of all, create a new document. You go to File> New or Ctrl + N on your keyboard.
New windows will appear. You can measure the size you want. Then you press the OK button.
You go to Tools and press Type Tool (T). And type the letter you want.
Go to the folder where the files of the Fonts you want. You select the Fonts you want and press the right mouse and choose the install. After the installation, in Set her fonts family, look for her.
For new creators of 3D text. Here it isvery easy to follow the tutorial below and make the style you want.
First make a new document in your Photoshop.
When you get a document you go to the tools area and select Type Tool (T). Write a letter that will make 3D.
Go to the Layer area and right click on the letter layer and select New 3D Extrusion from Selected Layer. It goes to the 3D area where you can change the style, color, and shape of the letter.
One of the Tools used is always the Move Tool (V). It has many uses. Especially when copying, transferring, adjusting, rotating, and more
Copy- Pull up or apply the Move Tool to the image that you want to copy. Press the right button on mouse of the computer and select the option, enter it if you copy, cut and more.
Transfer - You can move the image using the Move Tool. Hold the mouse arrow on your chosen image. left click and hold on the computer mouse.
Also use when switching Layer to Layer area. Also, do select Layer and transfer if increases or decreases.
Adjust- The Move Tool also uses the image we want to expand or shrink. We just need to select in the Layer area the layer of the image we want to adjust, and see the option in the Menu Bar. Click EDIT and look for TRANSFORM and choose whether to increase, eject and more. Go to the image and Move Tool the adjustment needed.
The menu bar controls what you will use for the procedure. Here is that at the top. The video explains here exactly how to use it. It's important to first study the mune bar, especially those who are new to using Photoshop.
Shows how to start especially when you are new. You know a lot of these basic techniques. Simplify rotating image, create a document, how to enter photoshop, and more.
You'll have trouble finding Photoshop Tutorials. Here is a crib for you. Basic and simple toturials for you.
There are many ways to improve the design of the letter. Now I teach you how to put different images in each letter. In my example I used my child's image. And in the letter it is his name.
First make a document with a transparent background or whatever your background color wants.
Make a letter. You are putting the image inside. Click Type tool > to create a text.
Click File > Open > You choose the image you want to put inside the letter. And click Open.
You choose the image you want to put in the first letter. Then you go to the layer and click on the image> right click> click clipping mask. And you adjust the image. Just repeat all the images you put in the letter.
You can watch my video tutorials. You can also subscribe to my channel.


 Richard N. Cabile